Friday, 22 May 2020

Chapter 1To 5 HTML

Contents

 
About
 
................................................................................................................................................................................... 1
 
Chapter 1: Getting started with HTML
 
................................................................................................................ 2
 
Section 1.1: Hello World 2
 
Chapter 2: Doctypes
 
.................................................................................................................................................... 4
 
Section 2.1: Adding the Doctype 4
Section 2.2: HTML 5 Doctype 4
 
Chapter 3: Headings
 
.................................................................................................................................................... 5
 
Section 3.1: Using Headings 5
 
Chapter 4: Paragraphs
 
.............................................................................................................................................. 6
 
Section 4.1: HTML Paragraphs
Chapter 5: Text Formatting
 
.....................................................................................................................................  6
.....................................................................................................................................  7
 
Section 5.1: Highlighting 7
Section 5.2: Bold, Italic, and Underline 7
Section 5.3: Abbreviation 8
Section 5.4: Inserted, Deleted, or Stricken 8
Section 5.5: Superscript and Subscript 8
 
Chapter 1: Getting started with HTML

Version Specification Release Date
1.0 N/A 1994-01-01
2.0 RFC 1866
1995-11-24
3.2 W3C: HTML 3.2 Specification
1997-01-14
4.0 W3C: HTML 4.0 Specification
1998-04-24
4.01 W3C: HTML 4.01 Specification
1999-12-24
5 WHATWG: HTML Living Standard
2014-10-28
5.1 W3C: HTML 5.1 Specification
2016-11-01
Section 1.1: Hello World
Introduction

HTML (Hypertext Markup Language) uses a markup system composed of elements which represent specific content. Markup means that with HTML you declare what is presented to a viewer, not how it is presented. Visual representations are defined by Cascading Style Sheets (CSS) and realized by browsers. Still existing elements that allow for such, like e.g. font, "are entirely obsolete, and must not be used by authors"[1].
HTML is sometimes called a programming language but it has no logic, so is a markup language. HTML tags provide semantic meaning and machine-readability to the content in the page.
An element usually consists of an opening tag (<element_name>), a closing tag (</element_name>), which contain the element's name surrounded by angle brackets, and the content in between:
<element_name>...content...</element_name>

There are some HTML elements that don't have a closing tag or any contents. These are called void elements. Void elements include <img>, <meta>, <link> and <input>.
Element names can be thought of as descriptive keywords for the content they contain, such as video, audio, table, footer.
A HTML page may consist of potentially hundreds of elements which are then read by a web browser, interpreted and rendered into human readable or audible content on the screen.
For this document it is important to note the difference between elements and tags:

Elements: video, audio, table, footer

Tags: <video>, <audio>, <table>, <footer>, </html>, </body>


Element insight

Let's break down a tag...

The <p> tag represents a common paragraph.

Elements commonly have an opening tag and a closing tag. The opening tag contains the element's name in angle brackets (<p>). The closing tag is identical to the opening tag with the addition of a forward slash (/) between the opening bracket and the element's name (</p>).
Content can then go between these two tags: <p>This is a simple paragraph.</p>.
 
Creating a simple page

The following HTML example creates a simple "Hello World" web page.

HTML files can be created using any text editor. The files must be saved with a .html or .htm[2] extension in order to be recognized as HTML files.

Once created, this file can be opened in any web browser.


Simple page break down

These are the tags used in the example:

Tag Meaning
<!DOCTYPE> Defines the HTML version used in the document. In this case it is HTML5.
See the doctypes topic for more information.
Opens the page. No markup should come after the closing tag (</html>). The lang attribute declares
 
<html>


<head>


<meta>
 
the primary language of the page using the ISO language codes (en for English). See the Content Language topic for more information.
Opens the head section, which does not appear in the main browser window but mainly contains information about the HTML document, called metadata. It can also contain imports from external stylesheets and scripts. The closing tag is </head>.
Gives the browser some metadata about the document. The charset attribute declares the character encoding. Modern HTML documents should always use UTF-8, even though it is not a requirement. In HTML, the <meta> tag does not require a closing tag.
See the Meta topic for more information.
 
<title> The title of the page. Text written between this opening and the closing tag (</title>) will be displayed on the tab of the page or in the title bar of the browser.
<body> Opens the part of the document displayed to users, i.e. all the visible or audible content of a page. No content should be added after the closing tag </body>.
<h1> A level 1 heading for the page.
See headings for more information.
<p> Represents a common paragraph of text.

1. ↑ HTML5, 11.2 Non-conforming features
2. ↑ .htm is inherited from the legacy DOS three character file extension limit.
 
Chapter 2: Doctypes

Doctypes - short for 'document type' - help browsers to understand the version of HTML the document is written in for better interpretability. Doctype declarations are not HTML tags and belong at the very top of a document. This topic explains the structure and declaration of various doctypes in HTML.
Section 2.1: Adding the Doctype
The <!DOCTYPE> declaration should always be included at the top of the HTML document, before the <html> tag.

Version ≥ 5

See HTML 5 Doctype for details on the HTML 5 Doctype.


Section 2.2: HTML 5 Doctype
HTML5 is not based on SGML (Standard Generalized Markup Language), and therefore does not require a reference to a DTD (Document Type Definition).
HTML 5 Doctype declaration:

Case Insensitivity

Per the W3.org HTML 5 DOCTYPE Spec:

A DOCTYPE must consist of the following components, in this order:

1. A string that is an ASCII case-insensitive match for the string "<!DOCTYPE".

therefore the following DOCTYPEs are also valid:


This SO article discusses the topic extensively: Uppercase or lowercase doctype?
 
Chapter 3: Headings

HTML provides not only plain paragraph tags, but six separate header tags to indicate headings of various sizes and thicknesses. Enumerated as heading 1 through heading 6, heading 1 has the largest and thickest text while heading 6 is the smallest and thinnest, down to the paragraph level. This topic details proper usage of these tags.
Section 3.1: Using Headings
Headings can be used to describe the topic they precede and they are defined with the <h1> to <h6> tags. Headings support all the global attributes.

<h1> defines the most important heading.
<h6> defines the least important heading.

Defining a heading:

Correct structure matters

Search engines and other user agents usually index page content based on heading elements, for example to create a table of contents, so using the correct structure for headings is important.
In general, an article should have one h1 element for the main title followed by h2 subtitles – going down a layer if necessary. If there are h1 elements on a higher level they shoudn't be used to describe any lower level content.

Example document (extra intendation to illustrate hierarchy):

 
Chapter 4: Paragraphs

Column Column
<p> Defines a paragraph
<br> Inserts a single line break
<pre> Defines pre-formatted text

Paragraphs are the most basic HTML element. This topic explains and demonstrates the usage of the paragraph element in HTML.

Section 4.1: HTML Paragraphs

The HTML <p> element defines a paragraph:


Display-

You cannot be sure how HTML will be displayed.

Large or small screens, and resized windows will create different results.

With HTML, you cannot change the output by adding extra spaces or extra lines in your HTML code. The browser will remove any extra spaces and extra lines when the page is displayed:
 
Chapter 5: Text Formatting

While most HTML tags are used to create elements, HTML also provides in-text formatting tags to apply specific text-related styles to portions of text. This topic includes examples of HTML text formatting such as highlighting, bolding, underlining, subscript, and stricken text

Section 5.1: Highlighting

The <mark> element is new in HTML5 and is used to mark or highlight text in a document "due to its relevance in another context".1

The most common example would be in the results of a search were the user has entered a search query and results are shown highlighting the desired query.


Output:


A common standard formatting is black text on a yellow background, but this can be changed with CSS.

Section 5.2: Bold, Italic, and Underline
Bold Text

To bold text, use the <strong> or <b> tags:


or


What's the difference? Semantics. <strong> is used to indicate that the text is fundamentally or semantically important to the surrounding text, while <b> indicates no such importance and simply represents text that should be bolded.

If you were to use <b> a text-to-speech program would not say the word(s) any differently than any of the other words around it - you are simply drawing attention to them without adding any additional importance. By using
<strong>, though, the same program would want to speak those word(s) with a different tone of voice to convey that the text is important in some way.

Italic Text

To italicize text, use the <em> or <i> tags:

 
or


What's the difference? Semantics. <em> is used to indicate that the text should have extra emphasis that should be stressed, while <i> simply represents text which should be set off from the normal text around it.

For example, if you wanted to stress the action inside a sentence, one might do so by emphasizing it in italics via
<em>: "Would you just submit the edit already?"

But if you were identifying a book or newspaper that you would normally italicize stylistically, you would simply use
<i>: "I was forced to read Romeo and Juliet in high school.

Underlined Text

While the <u> element itself was deprecated in HTMl 4, it was reintroduced with alternate semantic meaning in HTML 5 - to represent an unarticulated, non-textual annotation. You might use such a rendering to indicate misspelled text on the page, or for a Chinese proper name mark.


Section 5.3: Abbreviation

To mark some expression as an abbreviation, use <abbr> tag:


If present, the title attribute is used to present the full description of such abbreviation.

Section 5.4: Inserted, Deleted, or Stricken

To mark text as inserted, use the <ins> tag:


To mark text as deleted, use the <del> tag:


To strike through text, use the <s> tag:


Section 5.5: Superscript and Subscript

To offset text either upward or downward you can use the tags <sup> and <sub>. To create superscript:
 

To create subscript:
 
@EVERYTHINGNT

Continue reading


Read More :- "Chapter 1To 5 HTML"

15 Important Run Commands Every Windows User Should Know

There are several ways to efficiently access the files, folders, and programs in Windows operating system. We can create shortcuts, pin programs to the taskbar, Start menu shortcuts etc. but we can't do it for all programs in many cases. However, the Windows Run Command box is one of the most efficient ways of accessing system programs, folders, and settings.

In this article, I am going to share 15 most important Run commands for Windows users. These commands can make it easier to manage a lot of tasks.
How to open Windows Run command box?
You need to press Win+R (Hold Windows button then Press R)

Important Run Commands Every Windows User Should Know

1. %temp%
This is the fastest way to clear the temporary files from your computer. It can save a lot of space which was being wasted by temporary files.
2. cmd 
This command will open the windows DOS command prompt. Windows command prompt is very useful for performing many tasks which are not possible using graphical user interface.
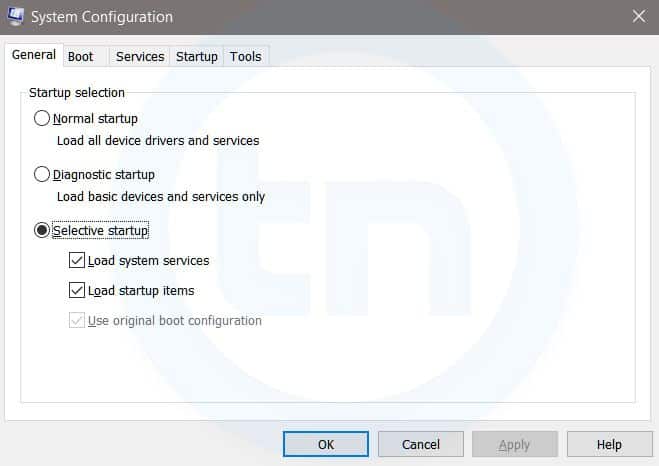
3. MSConfig
Windows Run Command - MSconfig-compressed
Windows System Configuration
This command will open Windows System Configuration where you can edit different things like the boot options, startup options, services, etc.
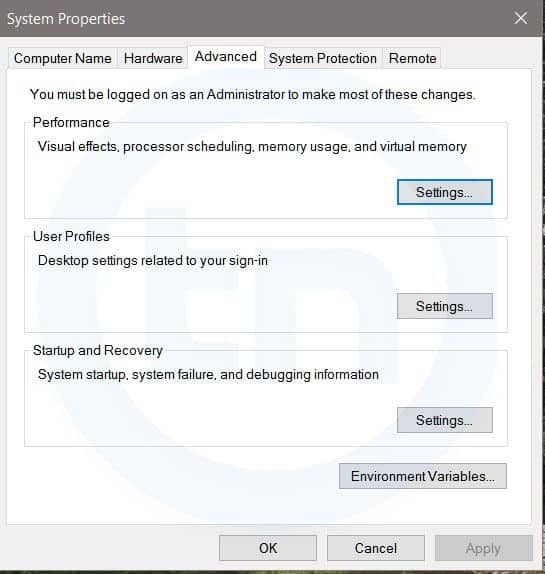
4. sysdm.cpl
Windows Run Command - sysdm cpl-compressed
System Properties window
This command will open the System Properties window, Where you can change the system protection and performance related many settings
5. Powershell
Powershell is very similar the command prompt. Just type this command in the Run dialog box, and you will have your PowerShell opened without administrator privileges.
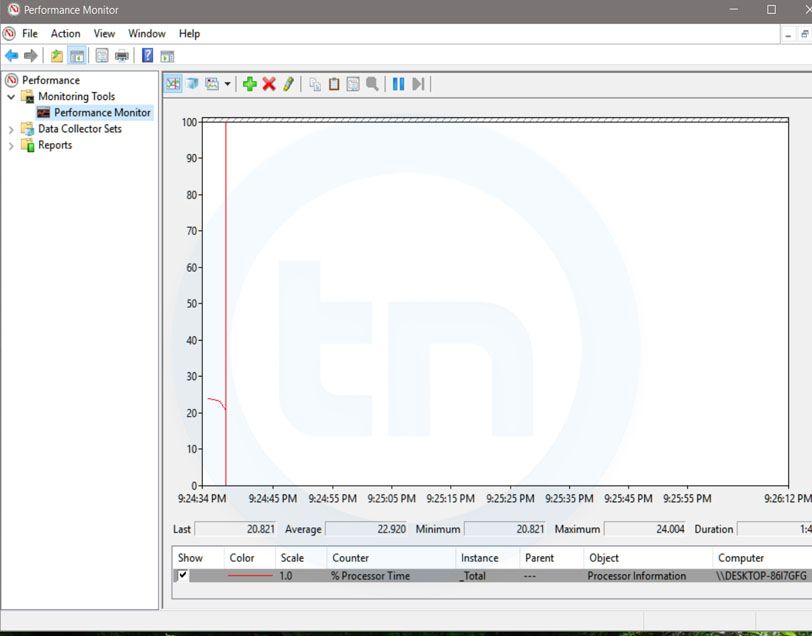
6. perfmon.msc
Windows Run Command - perfmon msc-compressed
Windows System Performance monitor
This command can be used to monitor the performance of your computer. There are plenty of options for monitoring the system performance
7. regedit
Regedit Run command is used to open the Windows Registry. It is a hierarchical database that hosts all the configurations and settings of Windows operating system, it's users and the installed software.
8. \ (Backslash)
This is one of the lesser known Run commands. Just enter the backslash into the Run dialog box and it will open up the C drive. It is one of the quickest ways to access the C drive.
9. . (Dot)
This is yet another lesser known Run command. When executed, it opens the current user's home folder which hosts all the other local folders like the Downloads, Documents, Desktop, Pictures, etc.
10. .. (Double Dots)
When you execute these two dots in the Run dialog box, it will open up the Users folder which is located directly on the C drive
11. Control
This command will open the control panel. Control panel is used for managing all the system settings and programs
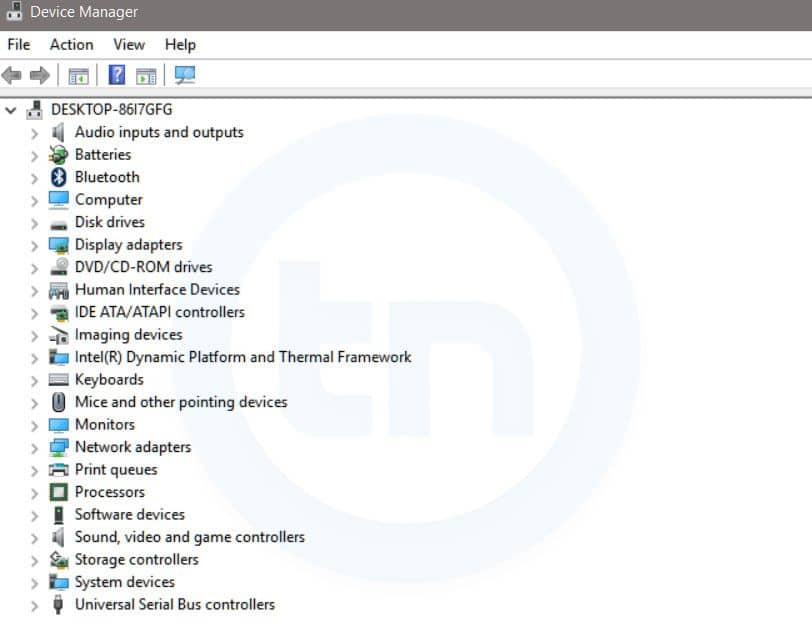
12. hdwwiz.cpl
Windows Run Command - hdwwiz-
Windows Device Manager
This command is used to open the Device Manager in Windows. You can manage all the device connected internally or externally to your PC.
13. Notepad
The quickest way to open notepad in Windows. Just type this command in Run Box and hit enter.
14. osk
This command will open On-Screen Keyboard on your display monitor. You can easily touch and type or use your mouse for typing.
15. taskmgr 
This command will open task manager where you can manage all the processes and programs running on Windows Operating system.
Related posts

  1. Phishing Hacking
  2. Geekprank Hacking
  3. Como Aprender A Hackear Desde Cero
  4. Javascript Hacking
  5. Password Hacking
  6. Hacking Social
  7. Hacking In Spanish
  8. Life Hacking
Read More :- "15 Important Run Commands Every Windows User Should Know"

Thursday, 21 May 2020

How To Pass Your Online Accounts After Death – 3 Methods

The topic of DEATH is not one that most people care to talk about, but the truth is that we are all going to die at some point and everything that we did online is going to end up in limbo if we don't make sure that someone we trust is going to be able to gain access to this information. This is going to be extremely important in order to close it down, or have your loved one do whatever you want them to do with your information. There are many things to take into consideration for this kind of situation. If you are like the average modern person, you probably have at least one email account, a couple of social media accounts in places like Facebook and Twitter. Perhaps you also have a website that you run or a blog. These are all very common things that people will usually do at some point and if you have anything that you consider valuable, you should have a way to leave it in the hands of someone you trust when you pass away.

Pass Accounts and Passwords After Death

Maybe you have an online platform that has a lot of content that you find useful and important. Perhaps you have even been able to turn some of that content into monetizable material and you don't want this to end when you pass away. This is more than enough of a reason to make sure that your information can be given to someone when you are no longer around.
There have been many cases when all the information has ended up being impossible to recover when a person has died, at least not without the need for the family members to do all kinds of things in order to prove a person is deceased. So here are some ways, you can passyour online accounts/data after death:

1) Making a Safe 'WILL' (or Locker) containing master password.

  1. Make an inventory of all your online accounts and list them on a piece of paper one by one and give it to your loved one. For eg:– Your primary email address
    – Your Facebook ID/email
    – The Bank account or Internet banking ID
    – etc. To clarify, it will be only a list of the accounts you want your loved one to be able to access after you're dead. Just the list of accounts, nothing else (no passwords).
  2. Set up a brand new e-mail address (Possibly Gmail account). Lets say youraccountsinfo@gmail.com
  3. Now from your usual email account, Send an e-mail to youraccountsinfo@gmail.com, with the following content:– dd349r4yt9dfj
    – sd456pu3t9p4
    – s2398sds4938523540
    – djfsf4p These are, of course, the passwords and account numbers that you want your loved one to have once you're dead.
  4. Tell your loved one that you did these things, and while you're at it, send him/her an e-mail from youraccountsinfo@gmail.com, so he/she will have the address handy in some special folder in his/her inbox.
  5. Put the password for youraccountsinfo@gmail.com in your will or write it down on paper and keep it safe in your bank locker. Don't include the e-mail address as well, just put something like "The password is: loveyourhoney432d".
And its done! Your loved one will only have the password once you're dead, and the info is also secure, since it's split in two places that cannot be easily connected, so if the e-mail address happens to be hacked, the perpetrator won't be able to use it to steal anything that you're going to leave for your loved one.

2) Preparing a Future email (SWITCH) containing login information

This method is very similar to the first one except in this case we will not be using a WILL or Locker. Instead we will be using a Service called "Dead Mans Switch" that creates a switch (Future email) and sends it to your recipients after a particular time interval. Here is how it works.
  1. Create a list of accounts as discussed in the first method and give it to your loved one.
  2. Register on "Dead mans switch" and create a switch containing all the corresponding passwords and enter the recipients email (Your loved one).
  3. Your switch will email you every so often, asking you to show that you are fine by clicking a link. If something happens to you, your switch would then send the email you wrote to the recipient you specified. Sort of an "electronic will", one could say.

3) Using password managers that have emergency access feature

Password managers like LastPass and Dashlane have a feature called as "emergency access".  It functions as a dead man's switch. You just have to add your loved one to your password manager, with emergency access rights. he/She does not see any of your information, nor can he/she log into your accounts normally.
But if the worst happens, your loved one can invoke the emergency access option. Next your password manager sends an email to you and starts a timer. If, after a certain amount of time interval, you have not refused the request, then your loved one gets full access to your password manager.
You can always decide what they can potentially gain access to, and you set the time delay.

Why should i bother about passing my digital legacy?

Of all the major online platforms, only Google and Facebook have provisions for Inactiveaccounts (in case of death). Google lets you plan for the inevitable ahead of time. Using the "Inactive Account Manager", you can designate a beneficiary who will inherit access to any or all of your Google accounts after a specified period of inactivity (the default is 3 months).
Facebook on the other hand will either delete your inactive account or turn it into a memorial page when their family can provide any proof of their death, but there is also a large number of platforms that don't have any specific way for people to be able to verify the death of a loved one in order to gain access to the accounts. In either case, you wouldn't want your family to have to suffer through any hassles and complications after you have passed away.
You should also consider the importance of being able to allow your loved ones to collect all the data you left behind. This means photos and experiences that can be used to show other generations the way that you lived and the kind of things you enjoyed doing.
Those memories are now easier to keep and the best photos can be downloaded for the purpose of printing them for photo albums or frames. Allowing them to have the chance to do this in a practical way is going to be a great gesture and securing any profitable information is going to be essential if you want a business or idea to keep moving forward with the help of those you trust.
This is the reason why you need to be able to pass your online account information after death, but no one wants to give access to this kind of information to their loved ones because it's of a private nature and we would feel uneasy knowing that others can access our private conversations or message.

Related news


  1. Hacker Significado
  2. Tools For Hacking Wifi
  3. Ingeniería Social. El Arte Del Hacking Personal Pdf
  4. Como Ser Hacker
  5. Hacking To The Gate
Read More :- "How To Pass Your Online Accounts After Death – 3 Methods"

How Do I Get Started With Bug Bounty ?

How do I get started with bug bounty hunting? How do I improve my skills?


These are some simple steps that every bug bounty hunter can use to get started and improve their skills:

Learn to make it; then break it!
A major chunk of the hacker's mindset consists of wanting to learn more. In order to really exploit issues and discover further potential vulnerabilities, hackers are encouraged to learn to build what they are targeting. By doing this, there is a greater likelihood that hacker will understand the component being targeted and where most issues appear. For example, when people ask me how to take over a sub-domain, I make sure they understand the Domain Name System (DNS) first and let them set up their own website to play around attempting to "claim" that domain.

Read books. Lots of books.
One way to get better is by reading fellow hunters' and hackers' write-ups. Follow /r/netsec and Twitter for fantastic write-ups ranging from a variety of security-related topics that will not only motivate you but help you improve. For a list of good books to read, please refer to "What books should I read?".

Join discussions and ask questions.
As you may be aware, the information security community is full of interesting discussions ranging from breaches to surveillance, and further. The bug bounty community consists of hunters, security analysts, and platform staff helping one and another get better at what they do. There are two very popular bug bounty forums: Bug Bounty Forum and Bug Bounty World.

Participate in open source projects; learn to code.
Go to https://github.com/explore or https://gitlab.com/explore/projects and pick a project to contribute to. By doing so you will improve your general coding and communication skills. On top of that, read https://learnpythonthehardway.org/ and https://linuxjourney.com/.

Help others. If you can teach it, you have mastered it.
Once you discover something new and believe others would benefit from learning about your discovery, publish a write-up about it. Not only will you help others, you will learn to really master the topic because you can actually explain it properly.

Smile when you get feedback and use it to your advantage.
The bug bounty community is full of people wanting to help others so do not be surprised if someone gives you some constructive feedback about your work. Learn from your mistakes and in doing so use it to your advantage. I have a little physical notebook where I keep track of the little things that I learnt during the day and the feedback that people gave me.


Learn to approach a target.
The first step when approaching a target is always going to be reconnaissance — preliminary gathering of information about the target. If the target is a web application, start by browsing around like a normal user and get to know the website's purpose. Then you can start enumerating endpoints such as sub-domains, ports and web paths.

A woodsman was once asked, "What would you do if you had just five minutes to chop down a tree?" He answered, "I would spend the first two and a half minutes sharpening my axe."
As you progress, you will start to notice patterns and find yourself refining your hunting methodology. You will probably also start automating a lot of the repetitive tasks.

Continue reading


  1. Informatico Hacker
  2. Hacking Articles
  3. Como Ser Hacker
  4. Rfid Hacking
  5. Phone Hacking
  6. Aprender Seguridad Informatica
  7. Seguridad Y Hacking
  8. Libros Hacking Pdf
  9. Hacking Xbox One
  10. Defcon Hacking
  11. Nfc Hacking
  12. Elladodelmal
  13. What Is Growth Hacking
  14. Ethical Hacking Curso
  15. Brain Hacking
  16. Growth Hacking Courses
Read More :- "How Do I Get Started With Bug Bounty ?"

HTML5 Games On Android

On my last hollidays, I made two HTML5 games, and published on android market. Nowadays javascript has powerful libraries for doing almost everything, and also there are several compilers from java or c code to javascript, converting opengl c code to html5 canvas, but definitely, javascript execution is slower than dalvik applications, and of course much slower than arm c libs. For improving the speed of sounds and images loader, I have used javascript asynchronous execution and scheduling priority has been controlled with setTimeout/setInterval which deprioritize or priorize a code block. This games are published on the android market here: Android Planets and here: Far Planet

More articles


Read More :- "HTML5 Games On Android"

Spaghetti: A Website Applications Security Scanner


About Spaghetti
   Author: m4ll0k   Spaghetti is an Open Source web application scanner, it is designed to find various default and insecure files, configurations, and misconfigurations. Spaghetti is built on Python 2.7 and can run on any platform which has a Python environment.

Spaghetti Installation:

Spaghetti's Features:
   Fingerprints:
  • Server:
  • Web Frameworks (CakePHP,CherryPy,...)
  • Web Application Firewall (Waf)
  • Content Management System (CMS)
  • Operating System (Linux,Unix,..)
  • Language (PHP,Ruby,...)
  • Cookie Security
   Discovery:
  • Bruteforce:Admin Interface
    Common Backdoors
    Common Backup Directory
    Common Backup File
    Common Directory
    Common FileLog File
  • Disclosure: Emails, Private IP, Credit Cards
   Attacks:
  • HTML Injection
  • SQL Injection
  • LDAP Injection
  • XPath Injection
  • Cross Site Scripting (XSS)
  • Remote File Inclusion (RFI)
  • PHP Code Injection
   Other:
  • HTTP Allow Methods
  • HTML Object
  • Multiple Index
  • Robots Paths
  • Web Dav
  • Cross Site Tracing (XST)
  • PHPINFO
  • .Listing
   Vulns:
  • ShellShock
  • Anonymous Cipher (CVE-2007-1858)
  • Crime (SPDY) (CVE-2012-4929)
  • Struts-Shock
Spaghetti Example:
python spaghetti --url example.com --scan 0 --random-agent --verbose


More articles


  1. White Hacking
  2. Hacking Hardware Tools
  3. Curso De Hacking Etico
  4. Como Ser Hacker
  5. Phone Hacking
  6. Growth Hacking Madrid
  7. Herramientas Hacking
  8. Life Hacking
  9. Hacking Apps
  10. Hacking Aves
  11. Hacking Kali Linux
  12. Python Desde 0 Hasta Hacking - Máster En Hacking Con Python
  13. Social Hacking
  14. House Hacking
  15. Hacking Quotes
Read More :- "Spaghetti: A Website Applications Security Scanner"

How To Protect Your Private Data From Android Apps

protect-private-data-from-apps
In android there is lots of personal data that can be accessed by any unauthorized apps that were installed on the device. This is just because your Android data is openly saved in your file explorer that is not encrypted or protected by encryption method, so, even normal app can also hijack your data very easily as the media access permissions are granted when you click on accept button while installing the apps. And this may be endangering the private data that you might not want to share with anyone. So here we have a cool way that will help you to make your data private by disallowing the apps to access your media files without your permission. So have a look on complete guide discussed below to proceed.

How To Protect Your Private Data From Android Apps

The method is quite simple and just need a rooted android device that will allow the Xposed installer to run on the device. And after having the Xposed installer you will be using an Xposed module to disallow the apps to have access to your personal or say private data. For this follow the guide below.

Steps To Protect Your Private Data From Android Apps:

Step 1. First of all, you need a rooted android as Xposed installer can only be installed on a rooted android, so Root your android to proceed for having superuser access on your android.
Step 2. After rooting your Android device you have to install the Xposed installer on your android and thats quite lengthy process and for that, you can proceed with our Guide to Install Xposed Installer On Android.Xposed Installer
Step 3. Now after having an Xposed framework on your Android the only thing you need is the Xposed module that is DonkeyGuard – Security Management the app that will allow you to manage the media access for apps installed on your device.
Step 4. Now install the app on your device and after that, you need to activate the module in the Xposed installer. Now you need to reboot your device to make the module work perfectly on your device.
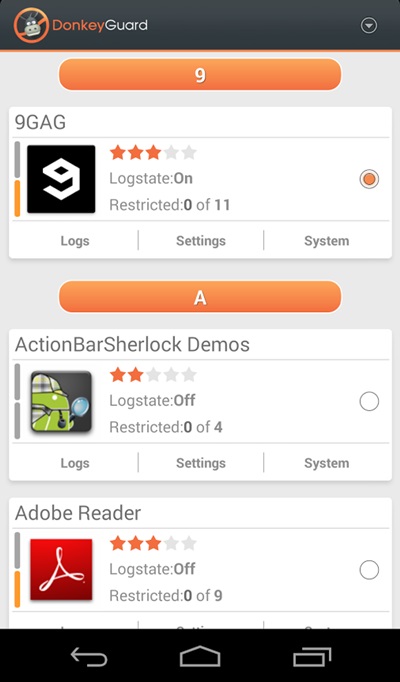
Step 5. Now launch the app and you will see all the apps that are currently installed on your device.
privacy 1
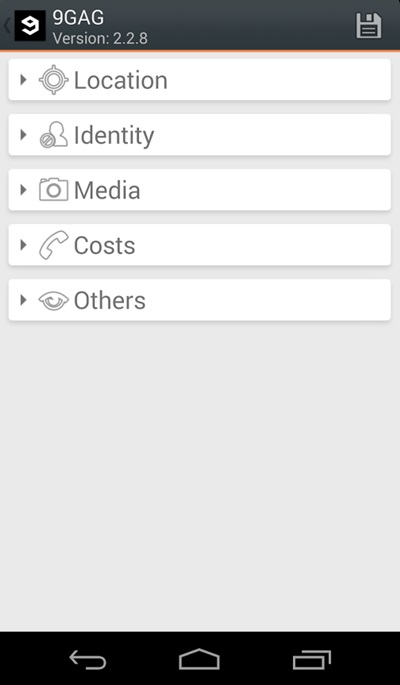
Step 6. Now edit the media permission for the apps that you don't want to have access to your media with private data.privacy 2
That's it, you are done! now the app will disallow the media access to that apps.

Manually Checking App Permission

Well, our Android operating system offers a nice feature in which we can manage a single app's permission. However, you need to have Android 6.0 Marshmallow or a newer version to get the option.
Step 1. First of all, open Settings and then tap on 'Apps'.
Manually Checking App Permission
Step 2. Now you will see the list of apps that are currently installed on your Android smartphone. Now you need to select the app, and then you will see 'Permissions.'
Manually Checking App Permission
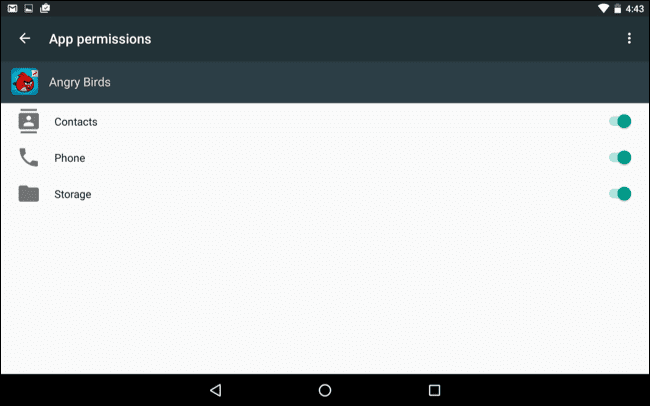
Step 3. Now it will open a new window, which will show you all permissions that you have granted to the app like Camera access, contacts, Location, microphone, etc. You can revoke any permissions as per your wish.
Manually Checking App Permission
Well, the same thing you need to perform if you feel that you have installed some suspicious app on your Android. By this way, you can protect your private data from Android apps.

Related news


Read More :- "How To Protect Your Private Data From Android Apps"